To keep your computer safe and clean of viruses that's one thing which is very important for your computer. But you don't want to get bothered with annoying warnings from Windows Vista each time you install a program or when you make a change in Vista's settings?
Without any doubt is Vista's most irritating tool the User Account Control (UAC). The User Account Control takes care that Windows asks permission to several system sources over and over again.
I have to admit that this standard setting helps you to keep your computer clean, but do you really want to give permission for every small setting change, like changing the Windows' standard font?
I think your answer is NO!

Thursday, July 2, 2009
Monday, April 27, 2009
You cannot access shared files and folders or browse computers in the workgroup with Windows XP
On Windows XP-based computers that are configured as members of a workgroup in a peer-to-peer network environment, you may experience one or more of the following symptoms:
This behavior may occur if all the following conditions are true:
- You cannot access shared folders or files.
- You cannot locate other computers in the workgroup.
- You receive the following error message when you double-click the workgroup in My Network Places:Workgroup Name is not accessible. You may not have permission to use this network resource.
This behavior may occur if all the following conditions are true:
- NetBIOS over TCP/IP is not turned on (enabled) on one or more computers in the workgroup.
- The Computer Browser service is not started or is turned off on one or more computers in the workgroup.
Method 1: Enable NetBIOS over TCP/IP and start the Computer Browser service
To resolve this issue, make sure that NetBIOS over TCP/IP is turned on and that the Computer Browser service is running on each computer in the workgroup. To do this, follow these steps.Step 1: Enable NetBIOS over TCP/IP
- Click Start, click Control Panel, and then click Network and Internet Connections.
- Click Network Connections.
- Right-click Local Area Connection, and then click Properties.
- Click Internet Protocol (TCP/IP), and then click Properties.
- Click the General tab, and then click Advanced.
- Click the WINS tab.
- Under NetBIOS setting, click Enable NetBIOS over TCP/IP, and then click OK two times.
- Click Close to close the Local Area Connection Properties dialog box.
- Close the Network Connections window.
Step 2: Start the Computer Browser service
- Click Start, right-click My Computer, and then click Manage.
- Double-click Services and Applications.
- Double-click Services.
- On the right side, right-click Computer Browser, and then click Start.
- Close the Computer Management window.
Method 2: Install File and Print Sharing and make sure that it is not blocked by Windows Firewall
Step 1: Install File and Print Sharing for Microsoft Networks
- Click Start, click Run, type ncpa.cpl, and then click OK.
- Right-click Local Area Connection, and then click Properties.
- Click the General tab, and then click Install.
- Click Service, and then click Add.
- In the Network Service list, click File and Print Sharing for Microsoft Networks, and then click OK.
- Click Close.
Step 2: Make sure that File and Printer Sharing is not blocked by Windows Firewall
- Click Start, click Run, type firewall.cpl, and then click OK.
- On the General tab, make sure that the Don't allow exceptions check box is not selected.
- Click the Exceptions tab.
- On the Exceptions tab, make sure that the File and Printer Sharing check box is selected, and then click OK.
Wednesday, April 8, 2009
Windows XP Shutdown Much Faster
One of the inconveniences that XP brings is it sometimes takes a lifetime before it fully shuts down. You may be wondering why I still post topics on XP, it is because there are still a lot of people that are still using XP on their computers, and I guess some of them are experiencing the eternal shutdown problem on their XP machines. The main reason for this problem is that one or more application is hanging up to 20 seconds while XP tries to shutdown. To resolve this I have here a simple registry tweak to force Windows XP to shut down more quickly. Before you jump into editing your registry it is highly advisable to first create backup of your registry.
step1: The first thing you need to do is to open your registry editor. Click Start –> Go to RUN and type REGEDIT
step2: Navigate to the following keys HKEY_CURRENT_USER \ Control Panel \ Desktop
Scroll Down and look for HungAppTimeout and change the default 5000 to 1000 then click OK
step3: Scroll down to WaitToKillAppTimeout and change it’s value from 20000 to 1000 then click OK. Don’t close your registry editor yet, we have still more values to change.
step4: Go to HKEY_LOCAL_MACHINE \ System \ CurrentControlSet \ Control and double click on WaitToKillServiceTimeout then change it’s value to 1000 then click OK.
step5: Now, navigate to HKEY_USERS \ DEFAULT \ Control Panel \ Desktop and change HungAppTimeout value to 1000 and click OK.
step6: Scroll down to WaitToKillAppTimeout change it to 1000 and click OK.
Your done, your XP will now shutdown much more quicker.
You can put any values that you prefer but you must make sure all values are uniform on all the settings.
Monday, March 23, 2009
Configure Windows Mail to connect to Gmail
![]() Continuing our “How to” series on configuring Windows Mail for different e-mail providers, today we are going to show you, step by step, how to configure Windows Mail to connect to your Gmail account. As you might now, Gmail offers free POP3 support for all accounts. However, in order to use it, you might need to activate it from the Gmail web interface.
Continuing our “How to” series on configuring Windows Mail for different e-mail providers, today we are going to show you, step by step, how to configure Windows Mail to connect to your Gmail account. As you might now, Gmail offers free POP3 support for all accounts. However, in order to use it, you might need to activate it from the Gmail web interface.
How to activate POP3 in Gmail
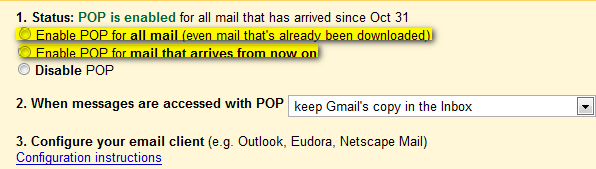
Before starting, please check if POP3 is activated for your Gmail account. To check, login to your account and go to Settings -> Forwarding and POP/IMAP.

Now activate your POP3 service by selecting one of these two options: Enable POP for all mail, or Enable POP for mail that arrives from now on.
How to configure Windows Mail
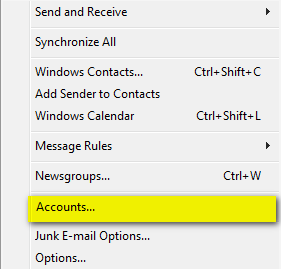
First, start Windows Mail. Go to the Tools menu and then click on the Accounts button as shown in the picture below.
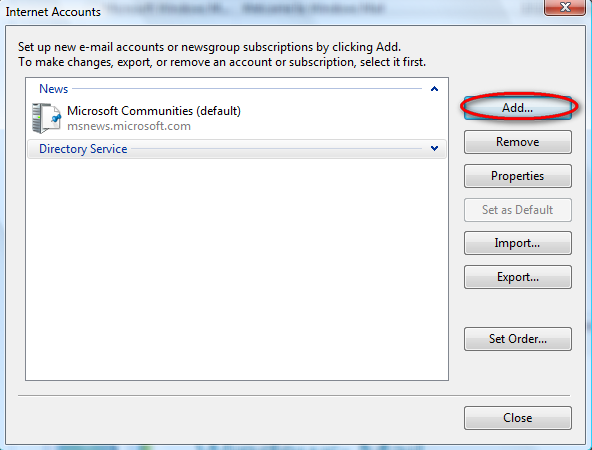
Then, click on the Add button.
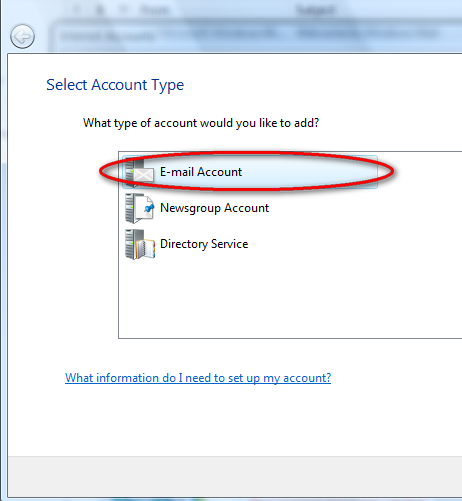
Select the E-mail Account option and click on Next.
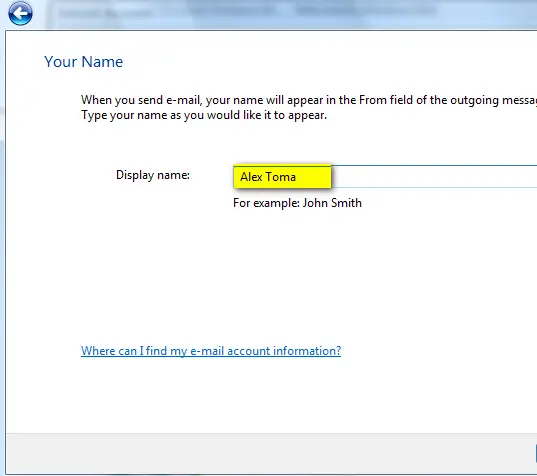
Next you can choose the display name that will be shown in every outgoing e-mail message. Type it and go to the next window.
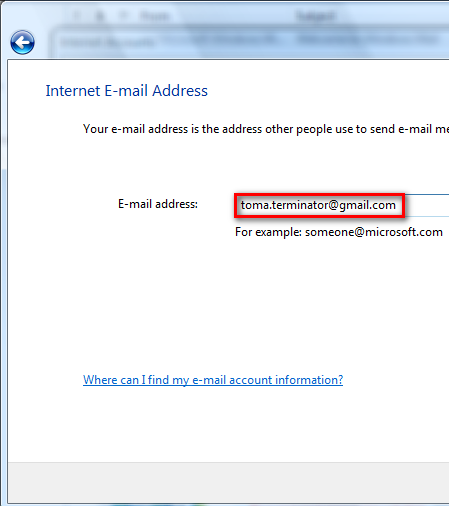
Now, you will be asked for your e-mail address. Type it and click on Next.
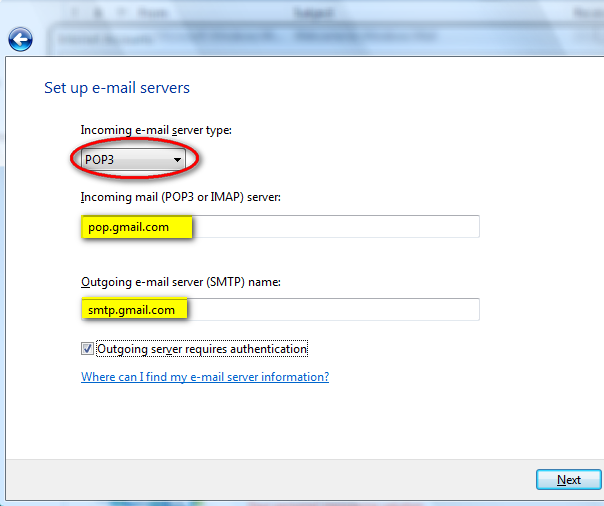
In the next window you have to setup the e-mail servers. From the Incoming e-mail server drop-down list, select POP3. Then, enter the Incoming & Outgoing server names as shown in the picture below and check the Outgoing server requires authentication option. When you are done, click on Next.
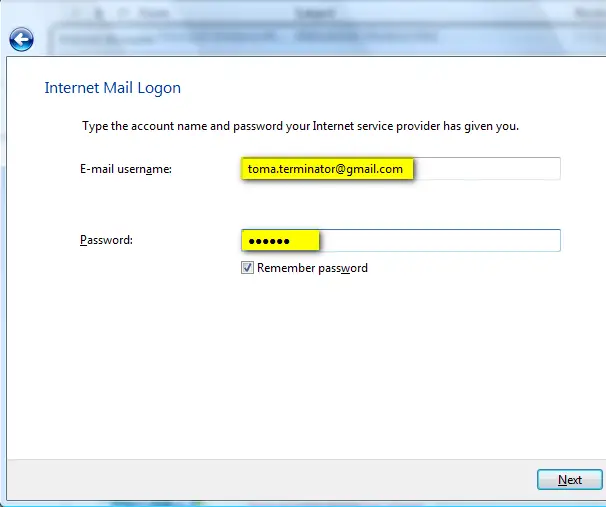
In the Internet Mail Logon window you have to enter your e-mail address and password. Also, for your ease-of-use, check the Remember password option and then click on Next.
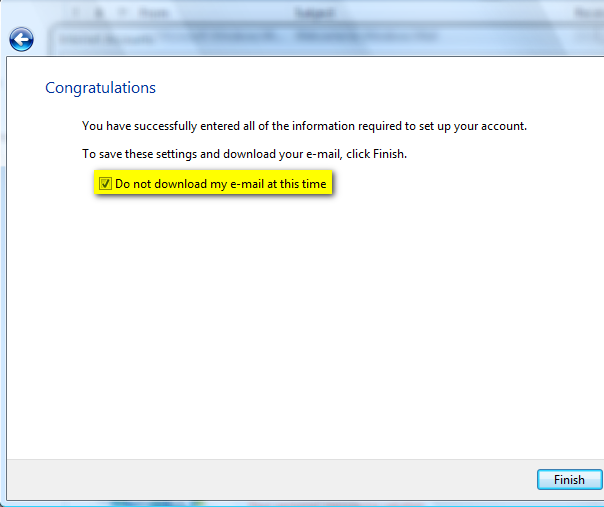
You are now almost done. Check the Do not download my e-mail at this time option as you will have to make some other minor adjustments. Then, click on the Finish button.
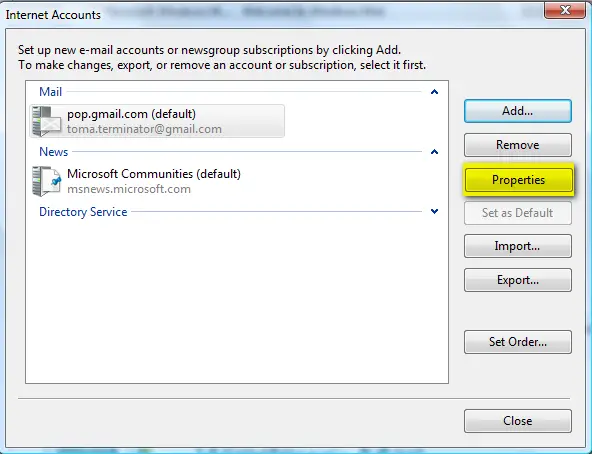
The Internet Accounts window should be opened. Select your Gmail account and click on Properties.
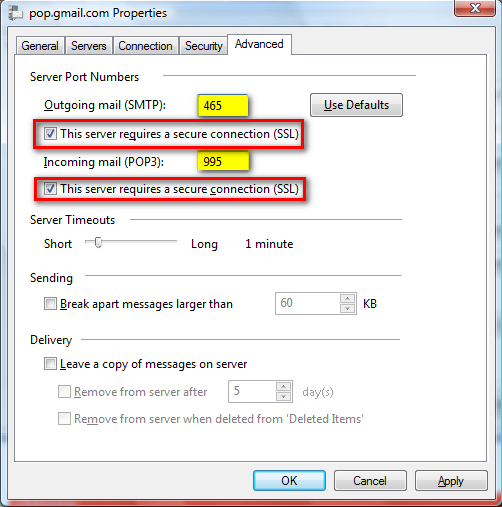
Go to the Advanced tab and type 465 as the port for the SMTP server and 995 for the POP3 server. Also, please note that you have to check the option that says “This server requires a secure connection (SSL)” for both POP3 and SMTP.
If you want your messages to be left on the Gmail servers as backup, then don’t forget to check the option that says Leave a copy of messages on server. If you do not check it, when a message is downloaded it is automatically removed from the Gmail servers. When finished, click on OK.
Windows Mail is now configured to access your Gmail account and download your messages. Press the Send/Receive button and the download will start.
Saturday, March 21, 2009
Work with shortcuts
You can’t be in more than one place at a time, but—with shortcuts—your files can. Shortcuts are links to programs, documents, files, or Web sites that you can add to your desktop or Start menu. Rather than searching through folders or the Internet every time you want to open a particular file or Web site, simply create a shortcut.
You may not know it, but you use shortcuts all the time. When you click the Start menu, every icon you see is a shortcut. The icons on your desktop are also shortcuts. Without these shortcuts (which are created by Windows or the programs you install), you would have to do a lot of extra work every time you wanted to open a program or empty your recycle bin.
You open a shortcut exactly as you would open a file: by double-clicking it. When you open a shortcut, Windows locates and opens the original file. If you delete the shortcut, the original file is still right where it was.
Find out how to:
| • | |
| • | |
| • | |
| • |
How to add a shortcut to your desktop
If you use your desktop frequently, you should consider adding shortcuts to your favorite files to your desktop.
To add a shortcut to a file on your desktop
1. | Browse your My Documents folder and subfolders to find the file you want to create a shortcut for. |
2. | Right-click the file you want to link to from your desktop, click Send To, and then click Desktop. |

Your file stays in the same place, but you now have a shortcut to that file on your desktop. Notice that the icon on your desktop has an arrow in the lower-left corner. This arrow indicates that you are clicking a shortcut and not the actual file.
![]()
If your desktop gets cluttered with too many shortcuts, you can organize and clean up your desktop.
How to add a shortcut to your Start menu
In addition to being able to add shortcuts to your desktop, you can also add shortcuts on your Start menu. Shortcuts to your favorite files can appear alongside your programs.
To add a shortcut to your Start menu
1. | Browse your My Documents folder and subfolders to find the file you want to create a shortcut for. |
2. | Drag the file to the Start button and hold it for about one second. |
3. | When the Start menu opens, drag the file to the location where you want to add it. |
4. | Drop the file where you want the shortcut, and a shortcut icon appears. |

How to add a shortcut to a Web site
In addition to linking to files on your own computer, you can create shortcuts to your favorite Web sites. Double-click the shortcut, and the Web site will open in your browser.
To create a shortcut to a Web site
1. | Open the Web site in Microsoft Internet Explorer. |
2. | Click and drag the Internet Explorer icon in the Address bar (next to the URL) to your desktop or to the Start menu.
For more detailed instructions, watch the video Creating a desktop shortcut to a Web site. Watching the video requires that you have Windows Media Player. |
How to change the icons in your shortcuts
Shortcuts include a picture called an icon, which can help you find a program or file faster. For example, the My Computer shortcut shows a computer icon, and the Recycle Bin shortcut shows a trash can icon.
![]()
When you change your Windows theme, the new theme might include a set of custom icons that complement the look of the new desktop. For example, a jungle theme might change your My Computer icon to a giraffe. If you want, you can change one or more icons to something more interesting to you.
The method for changing an icon depends on the icon type. You can:
| • | |
| • |
How to change system icons
To change system icons
1. | Right-click your desktop, and then click Properties.
|
2. | In the Display Properties dialog box, click the Desktop tab. Then click Customize Desktop.
|
3. | On the General tab, click the icon you want to change. Then, click Change Icon.
|
4. | Click the Browse button, and select the folder to which you saved your icons. Click the View Menu button, and then click Thumbnails.
|
5. | Click the icon you want to use, and then click Open.
|
6. | Click OK.
|
7. | Repeat steps 3 through 6 to change other icons. When you are finished changing your icons, click OK twice.
|


How to change non-system icons
To change icons other than system icons
1. | Find icons that suit your sense of style. For example, enter "download Windows icons" in your favorite Internet search tool. |
2. | Download the icons and save them to your computer. |
3. | Right-click the shortcut for which you want to change the icon, and then click Properties.
|
4. | On the Shortcut tab in the Internet Explorer Properties dialog box, click Change Icon.
|
5. | Click the Browse button.
|
6. | Select the folder to which you saved your icons. Click the View Menu button, and then click Thumbnails.
|
7. | Select the icon you want to use, and then click Open.
|
8. | Click OK.
|
9. | In the Internet Explorer Properties dialog box, click OK again.
|
10. | Repeat steps 3 through 9 to change additional icons. Source: http://www.microsoft.com/ |


Simplify using your mouse: change double-click to single-click
Simplify using your mouse: change double-click to single-click
Published: September 7, 2006
When you browse the Web with Microsoft Internet Explorer, links open with a single click. Yet, when you browse My Computer or My Documents, a single click lets you select a file or folder, but you have to double-click to open it.
If you'd rather single-click to open files and folders, you can change the setting on your mouse (don't worry, this process doesn't require any double clicks).
To change the settings on your mouse
1. | Click Start, and then click My Computer.
|
2. | Click Tools, and then click Folder Options.
|
3. | Click Single-click to open an item. Then, click OK.
|


Now you can navigate folders and open files with a single rather than a double click. If you need to select a file, simply hold your mouse over the file for a few seconds without clicking.
Thursday, March 12, 2009
10.11.12 Understanding System Restore
Using System Restore in previous versions of Windows has been something of a gamble. There's no way of telling which applications or drivers it might affect - you just have to try it and see.
Windows 7 is different. Right-click Computer, select Properties > System Protection > System Restore > Next, and choose the restore point you'd like to use. Click the new button to 'Scan for affected programs' and Windows will tell you which (if any) programs and drivers will be deleted or recovered by selecting this restore point.
11. Set the time zone
System administrators will appreciate the new command line tzutil.exe utility, which lets you set a PC's time zone from scripts. If you wanted to set a PC to Greenwich Mean Time, for instance, you'd use the command
tzutil /s "gmt standard time"
The command "tzutil /g" displays the current time zone, "tzutil /l" lists all possible time zones, and "tzutil /?" displays details on how the command works.
12. Calibrate your screen
The colours you see on your screen will vary depending on your monitor, graphics cards settings, lighting and more, yet most people use the same default Windows colour profile. And that means a digital photo you think looks perfect might appear very poor to everybody else. Fortunately Windows 7 now provides a Display Colour Calibration Wizard that helps you properly set up your brightness, contrast and colour settings, and a ClearType tuner to ensure text is crisp and sharp. Click Start, type DCCW and press [Enter] to give it a try.
9. Automatic PC clean up
If inexperienced PC users sometimes access your system then you'll know that, well, this can cause problems. Leave them alone for too long and they'll mess up your settings, install dubious programs, delete important files and cause all kinds of havoc. But Microsoft feels your pain, and Windows 7 will include a possible solution: PC Safeguard. This lets your less technical users log on, play games, use the browser or chat on an instant messenger, say, just as normal. But when they log off, any settings they've changed are undone, and any files they've saved are deleted. Which means it's much more difficult to mess up your PC.
This isn't a new technology. Microsoft have made their Shared Computer Toolkit (aka Windows SteadyState) freely available for years, and this does exactly the same thing (it's more configurable, too). This is the first time it's been fully integrated with Windows, though, which makes it much easier to use.
To give PC Safeguard a try, go to Control Panel > User Accounts and Family Safety > User Accounts > Manage another account > Create a new account. Enter an account name, click Create, then click the account, select Set Up PC Safeguard > Turn on PC Safeguard > Apply. Log on as that user, try downloading and installing a program, then restart and log on again to confirm that the software has gone.
6,7,8 Take control
Tired of the kids installing dubious software or running applications you'd rather they left alone? AppLocker is a new Windows 7 feature that ensures users can only run the programs you specify. Don't worry, that's easier to set up than it sounds: you can create a rule to allow everything signed by a particular publisher, so choose Microsoft, say, and that one rule will let you run all signed Microsoft applications. Launch GPEDIT.MSC and go to Computer Configuration > Windows Settings > Security Settings > Application Control Policies > AppLocker to get a feel for how this works.
7. Calculate more
At first glance the Windows 7 calculator looks just like Vista's version, but explore the Mode menu and you'll see powerful new Statistics and Programmer views. And if you're clueless about bitwise manipulation, then try the Options menu instead. This offers many different unit conversions (length, weight, volume and more), date calculations (how many days between two dates?), and spreadsheet-type templates to help you calculate vehicle mileage, mortgage rates and more.
Don't take any Windows 7 applet at face value, then - there are some very powerful new features hidden in the background. Be sure to explore every option in all Windows applets to ensure you don't miss anything important.
8. Switch to a projector
Windows 7 now provides a standard way to switch your display from one monitor to another, or a projector - just press Win+P or run DisplaySwitch.exe and choose your preferred display. (This will have no effect if you've only one display connected.)
Subscribe to:
Posts (Atom)